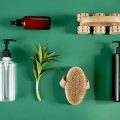
Understanding Clean Beauty and Why It Matters
Clean beauty has become more than just a trend in the U.S.—its now a movement toward healthier, safer, and more eco-conscious choices when it comes to makeup and skincare. But what exactly does “clean beauty” mean? Simply put, clean beauty refers to products made without harmful or toxic ingredients. These products are created with transparency, safety, and sustainability in mind.
What Makes a Product “Clean”?
In the U.S., there’s no official government definition for clean beauty, so many brands define it themselves. However, most clean beauty products share some common standards. Here are key features that help identify a clean product:
| Feature | Description |
|---|---|
| Ingredient Transparency | Brands clearly list all ingredients, avoiding hidden chemicals or vague terms like “fragrance.” |
| No Toxic Chemicals | Free from parabens, phthalates, sulfates, synthetic dyes, and other potentially harmful ingredients. |
| Cruelty-Free | Not tested on animals at any stage of production. |
| Sustainable Packaging | Uses recyclable, biodegradable, or reusable materials to reduce environmental impact. |
Why More Americans Are Choosing Natural Products
People across the U.S. are becoming more aware of what they put on their skin—and how those choices affect their health and the planet. With growing concerns about allergies, hormone disruption, and environmental damage, natural makeup is now seen as a safer alternative to conventional products.
Common Reasons People Switch to Clean Beauty:
- Health Concerns: Avoiding harsh chemicals that may irritate skin or cause long-term health issues.
- Eco-Conscious Lifestyle: Supporting brands that care about sustainability and reducing waste.
- Better Ingredient Knowledge: Consumers want to understand whats in their products.
- Sensitive Skin: Natural formulas are often gentler and less likely to cause reactions.
The Role of DIY in Clean Beauty
One of the best ways to ensure youre using clean products is by making them yourself at home. When you create your own natural makeup, you have full control over every ingredient—no surprises, no hidden chemicals. Plus, its fun and empowering! In the next sections, we’ll dive into simple recipes and tips for making your own clean beauty products from scratch using safe, easy-to-find ingredients.
2. Essential Ingredients for DIY Natural Makeup
Creating your own natural makeup at home starts with choosing the right ingredients—ones that are not only safe and non-toxic but also easy to find at your local health food store or online. Here are some of the most popular and effective natural ingredients you can use to create everything from foundation to blush, lip balm, and more.
Cocoa Powder
Cocoa powder isn’t just for baking—it’s a fantastic natural pigment for bronzers and contour powders. It gives a warm, earthy tone and smells amazing too. Make sure to choose unsweetened, 100% pure cocoa powder for best results.
Uses:
- Bronzer
- Contour powder
- Eyeshadow (for a soft brown shade)
Beetroot Powder
Beetroot powder is a vibrant pink-red powder made from dried beets. It’s perfect for adding a natural flush of color to cheeks and lips. Plus, it contains antioxidants that are great for your skin.
Uses:
- Blush
- Lip tint
Shea Butter
This rich, creamy butter derived from the nuts of the shea tree is a moisturizing superstar. It’s commonly used as a base in DIY lip balms, foundations, and cream blushes thanks to its smooth texture and skin-loving nutrients.
Uses:
- Lip balm base
- Foundation or BB cream base
- Cream blush base
Arrowroot Powder
Arrowroot powder is a natural starch that works well as a setting powder or foundation base. Its lightweight and helps absorb excess oil without clogging pores, making it ideal for oily or combination skin types.
Uses:
- Setting powder
- Face powder/foundation base when mixed with other pigments
Quick Reference Table: Ingredient Uses & Benefits
| Ingredient | Main Use(s) | Main Benefit(s) |
|---|---|---|
| Cocoa Powder | Bronzer, Contour, Eyeshadow | Naturally pigmented, antioxidant-rich, pleasant scent |
| Beetroot Powder | Blush, Lip Tint | Vibrant color, rich in antioxidants |
| Shea Butter | Lip Balm, Foundation Base, Cream Blush Base | Deeply moisturizing, smooth texture, nourishes skin |
| Arrowroot Powder | Setting Powder, Face Powder Base | Oil-absorbing, lightweight, gentle on sensitive skin |
These essential ingredients are not only versatile but also align with clean beauty principles—free from synthetic chemicals and full of nourishing properties. As you build your DIY makeup kit, these items will be your go-to staples for creating products that are both beautiful and good for your skin.

3. Must-Have Tools and Supplies for Homemade Cosmetics
If youre ready to dive into the world of DIY natural makeup, having the right tools on hand is key. Creating your own cosmetics at home is not only fun but also allows you to control every ingredient that goes on your skin. To keep things simple and safe, start by gathering some basic supplies that are easy to find and affordable.
Essential Tools for Mixing and Measuring
Accurate measurements and clean mixing are crucial when making homemade beauty products. Heres a list of the must-have tools to get started:
| Tool | Purpose |
|---|---|
| Measuring spoons | To measure small amounts of ingredients like pigments or essential oils |
| Measuring cups | For measuring larger quantities like carrier oils or butters |
| Mixing bowls (glass or stainless steel) | For combining ingredients safely without contamination or chemical reaction |
| Mini whisks or spatulas | To blend powders and liquids evenly |
| Pipettes or droppers | Ideal for adding precise drops of essential oils or liquid extracts |
Storage Containers for Your DIY Makeup
Once youve created your product, youll need clean containers to store them properly. Here are some popular options:
| Container Type | Best For |
|---|---|
| Tin jars or metal pans | Lip balms, solid perfumes, or cream blushes |
| Glass dropper bottles | Facial serums, oil-based foundations, or liquid tints |
| Plastic squeeze tubes (BPA-free) | Lotion sticks, tinted moisturizers, or gel-based products |
| Acrylic powder jars with sifters | Loose setting powders or mineral foundation blends |
Sanitizing Materials for Safe Production
Cleanliness is super important when working with makeup—especially if youre using natural ingredients that can spoil faster than commercial ones. Make sure to have these items ready before you start:
- Rubbing alcohol (70%–90%): Use it to disinfect your tools and containers before each use.
- Cotton pads or paper towels: For wiping down surfaces and cleaning up spills.
- Gloves: Optional but great for preventing bacteria transfer from hands to product.
- Airtight storage bins: Keep your ingredients in a cool, dry place away from sunlight.
Pro Tip:
If you’re planning on making multiple batches or giving homemade makeup as gifts, consider labeling each container with the name of the product and date it was made. This helps track freshness and ensures youre always using the safest formulations.
Your DIY Setup Doesn’t Have to Be Fancy!
You don’t need a professional lab to make clean beauty at home—just a few dedicated tools, some creativity, and a love for natural ingredients. With this starter toolkit, you’re well on your way to crafting safe, effective makeup right from your kitchen.
4. Simple Recipes for Everyday Natural Makeup
Making your own natural makeup at home is easier than you might think. With just a few clean ingredients and the right steps, you can create everyday beauty essentials that are gentle on your skin and actually work. Here’s how to make foundation, blush, lip balm, and mascara from scratch using non-toxic, skin-loving ingredients.
DIY Natural Foundation
This simple recipe gives you a customizable powder foundation using ingredients you probably already have in your kitchen.
Ingredients:
- 1 tbsp arrowroot powder (base)
- Cocoa powder (for color)
- Cinnamon or nutmeg (optional for tone adjustment)
- Kaolin clay (optional for oil control)
Instructions:
- Start with arrowroot powder as your base.
- Add small amounts of cocoa powder until you reach your desired shade.
- Mix in a pinch of cinnamon or nutmeg to match your undertone if needed.
- Add kaolin clay if you want more oil absorption.
- Store in a clean container and apply with a brush.
DIY Cream Blush
This hydrating cream blush adds a natural flush to your cheeks with nourishing oils.
Ingredients:
- 1 tsp shea butter
- 1 tsp beeswax pellets
- 1 tsp jojoba oil or almond oil
- Beetroot powder or mica powder (for color)
Instructions:
- Melt the shea butter, beeswax, and jojoba oil together using a double boiler.
- Remove from heat and stir in beetroot or mica powder until well blended.
- Pour into a small tin or jar and let it cool completely.
- Dab onto cheeks with fingers or a sponge for a dewy finish.
DIY Tinted Lip Balm
This tinted balm keeps lips soft while adding a touch of color—perfect for everyday wear.
| Ingredient | Amount |
|---|---|
| Coconut oil | 1 tsp |
| Beeswax pellets | 1 tsp |
| Cocoa butter (optional) | ½ tsp |
| Tint (beetroot powder or natural mica) | ¼ tsp or to preference |
Instructions:
- Melt coconut oil, beeswax, and cocoa butter over low heat.
- Add tint and stir until smooth.
- Pour into lip balm tubes or small containers and let it set.
- Apply as needed for moisture and color.
DIY Natural Mascara
This homemade mascara nourishes lashes while giving them definition without harsh chemicals.
Ingredients:
- 1 tsp coconut oil
- 1 tsp aloe vera gel
- ½ tsp grated beeswax
- Activated charcoal (for black) or cocoa powder (for brown)
Instructions:
- Melt coconut oil and beeswax together over low heat.
- Add aloe vera gel and mix thoroughly.
- Add activated charcoal or cocoa powder for color, mixing until smooth.
- Spoon the mixture into a clean mascara tube using a small funnel or syringe.
- Use within three months. Store in a cool, dry place.
The best part about these DIY recipes? You can tweak them to suit your skin type and preferred finish—whether you like matte, dewy, subtle, or bold. All while keeping things clean, safe, and totally customizable from the comfort of your home.
5. Tips for Storing, Using, and Customizing Your DIY Products
Making your own natural makeup at home is fun and rewarding, but to make sure your products stay fresh and work well, its important to store them properly, use them safely, and customize them based on your unique skin needs. Here’s how you can get the most out of your homemade clean beauty items.
Safe Storage Tips
Natural ingredients don’t contain preservatives like store-bought makeup, so storing them the right way helps extend their shelf life and keep bacteria away.
| Product Type | Storage Method | Shelf Life |
|---|---|---|
| Lip balm | Keep in a small tin or twist-up tube; store in a cool, dry place | 6–12 months |
| Cream blush or foundation | Use an airtight glass jar; refrigerate if using fresh ingredients like aloe vera | 1–3 months |
| Powder products (like setting powder) | Store in a sealed container away from moisture | 12 months+ |
How to Use Your DIY Makeup Safely
- Always wash your hands before applying any product to avoid contamination.
- Use clean tools, such as brushes or spatulas, instead of dipping fingers into containers.
- Do a patch test: Apply a small amount of the product to your inner arm and wait 24 hours to check for irritation or allergic reaction.
- If it smells off or changes color/texture, toss it out—natural products can spoil!
Customizing for Your Skin Tone and Type
The beauty of DIY makeup is that you can tweak each recipe to match your personal needs. Here’s how to make adjustments:
Adjusting for Skin Tone
| Skin Tone | Tweaks You Can Make |
|---|---|
| Fair skin | Add a bit more arrowroot powder or white clay for lighter shades; go light on cocoa powder or cinnamon. |
| Medium/Olive skin | Add small amounts of cocoa powder for warmth; turmeric can help balance undertones. |
| Deep skin tones | Use cocoa powder, activated charcoal (sparingly), or beetroot powder for rich pigments. |
Adjusting for Skin Type
| Skin Type | Recommended Adjustments |
|---|---|
| Oily skin | Add oil-absorbing ingredients like kaolin clay or bentonite clay; use fewer carrier oils. |
| Dry skin | Add hydrating ingredients like shea butter, jojoba oil, or aloe vera gel. |
| Sensitive skin | Avoid essential oils with strong scents; stick to gentle ingredients like chamomile powder and calendula oil. |
Avoid These Common Mistakes
- Skipping sterilization: Always sanitize containers and tools before use to prevent bacterial growth.
- Not labeling products: Write the name and date on each item so you know when to toss it.
- Mismatching ingredients: Some natural ingredients can interact poorly—research combinations if youre mixing multiple active botanicals.
- Irritating additives: Be cautious with essential oils; too much can irritate the skin even if they’re natural.
Your homemade natural makeup should feel good on your skin and reflect what works best for you. With these simple tips, you’ll be able to keep your DIY products safe, effective, and uniquely yours!