Introduction to the No-Makeup Makeup Look
The no-makeup makeup look has taken the American beauty world by storm, celebrated for its fresh, effortless vibe and emphasis on natural beauty. This trend is rooted in the philosophy that makeup should enhance your features, not mask them. For many Americans, especially those balancing busy lifestyles, the appeal lies in looking polished yet approachable—like you, just a bit more radiant. The popularity of this look reflects a broader cultural shift towards authenticity and self-acceptance, encouraging people to embrace their unique skin textures and tones. By focusing on subtle techniques and carefully chosen products—particularly blush and bronzer—this makeup style allows you to create a healthy, sun-kissed glow without appearing overdone. Below is a quick comparison between traditional full-glam makeup and the no-makeup makeup approach:
| Aspect | Full-Glam Makeup | No-Makeup Makeup |
|---|---|---|
| Coverage | High coverage, flawless finish | Sheer, natural coverage |
| Color Palette | Bold colors, dramatic contrast | Neutral tones, soft hues |
| Main Goal | Transformation, high impact | Enhancement, low-key radiance |
This understated approach has become a staple among Americans of all ages who value both simplicity and self-expression. In the following sections, we’ll break down how to master the no-makeup makeup look using just blush and bronzer for an effortless everyday glow.
2. Choosing the Right Blush and Bronzer Shades
Achieving a flawless no-makeup makeup look starts with picking blush and bronzer shades that effortlessly blend into your natural skin tone. The goal is to enhance your complexion subtly, so it looks like you’re glowing from within rather than wearing obvious makeup. When selecting blush and bronzer, keep in mind both your undertone and depth of skin tone for the most seamless results. Below are some tips to help you find your perfect match:
Tips for Selecting Blush Shades
- Identify Your Skin Undertone: If you have cool undertones (your veins appear blue and silver jewelry flatters you), opt for rosy or berry blushes. For warm undertones (your veins look green and gold jewelry suits you), choose peachy or apricot shades.
- Match Depth to Skin Tone: Fair skin looks best with soft pinks or light peaches, medium skin glows with mauves or warm corals, and deeper skin tones shine with rich berries or terracotta hues.
- Cream vs. Powder: Cream blushes melt into the skin for a dewy finish, perfect for that barely-there look. Powders offer more control if you prefer a matte effect.
Tips for Selecting Bronzer Shades
- Go Subtle: Pick a bronzer just one to two shades darker than your natural skin tone to avoid harsh lines or an unnatural look.
- Undertone Matters: Choose a bronzer with a neutral or slightly warm undertone; avoid anything too orange or too cool-toned for a naturally sun-kissed appearance.
- Finish Counts: Matte bronzers work well for contouring and adding warmth without shimmer, while subtle satin finishes can give a healthy glow without looking overdone.
Blush & Bronzer Shade Guide by Skin Tone
| Skin Tone | Blush Shades | Bronzer Shades |
|---|---|---|
| Fair | Ballet pink, soft peach | Pale taupe, light beige |
| Light/Medium | Mauve, coral, apricot | Golden tan, honey bronze |
| Tan/Olive | Terracotta, warm rose | Caramel, deep golden brown |
| Deep | Burgundy, brick red | Espresso, rich chocolate brown |
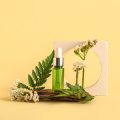
Pro Tip:
Simplify your routine by swatching blush and bronzer on your jawline in natural light before buying—this helps ensure they blend seamlessly into your complexion for that effortless no-makeup vibe.
![]()
3. Prepping Your Skin for a Natural Finish
Achieving the no-makeup makeup look starts with flawless skin prep. To make your blush and bronzer blend seamlessly and appear as natural as possible, priming and hydrating are essential steps. This ensures your complexion looks fresh, dewy, and never cakey—key for an effortless American beauty vibe.
Why Priming and Hydrating Matter
Priming creates a smooth canvas, filling in pores and fine lines so that makeup sits beautifully without settling or fading throughout the day. Hydration, on the other hand, plumps up your skin, giving it that lit-from-within glow Americans love for their “barely-there” aesthetic.
Essential Skin Prep Steps
| Step | Product Type | Tips for Best Results |
|---|---|---|
| Cleanse | Gentle cleanser | Remove any dirt or oil to ensure products apply evenly. |
| Hydrate | Lightweight moisturizer | Choose one that absorbs quickly but locks in moisture. |
| Prime | Smoothing primer | Focus on areas with larger pores or texture; use a pea-sized amount. |
| Protect | Broad-spectrum sunscreen (optional) | If you’re heading outside, always layer SPF under your makeup. |
American Insider Tip:
A lot of American beauty enthusiasts swear by multi-tasking primers with added skincare benefits—think hyaluronic acid for hydration or green tea extract for calming redness. Choosing a primer that suits your skin’s unique needs is a game-changer for natural-looking results.
The Key: Less Is More
The secret to prepping your skin for the no-makeup look is not to overload it with heavy creams or thick primers. Stick to lightweight formulas that absorb fast and leave no residue. This way, when you move on to blush and bronzer, they’ll melt into your skin rather than sitting on top of it. A light touch here sets the stage for that effortlessly radiant American finish.
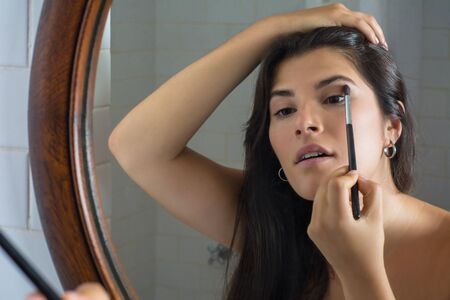
4. Application Techniques: Less Is More
When it comes to mastering the “no-makeup” makeup look, applying blush and bronzer with a light hand is key. American makeup artists emphasize subtlety to achieve that coveted fresh-faced glow, ensuring your skin looks naturally radiant rather than overly sculpted or colored. Here are some expert-approved techniques to help you get it right:
Choose the Right Tools
Using the proper brushes makes all the difference. Opt for fluffy, medium-sized brushes that distribute product evenly without leaving harsh lines. Synthetic bristles work well for cream formulas, while natural bristles are great for powders.
Blush Application: Soft and Natural
For a barely-there flush, smile gently and apply blush to the apples of your cheeks, blending upward toward your temples. Cream blushes can be tapped on with fingers for a seamless finish, while powder blush should be swept lightly in circular motions.
| Blush Type | Application Tool | Technique |
|---|---|---|
| Cream | Fingertips/Sponge | Tap and blend into skin for a dewy look |
| Powder | Fluffy Brush | Sweep in circles for soft diffusion |
Bronzer Application: Subtle Sun-Kissed Effect
For bronzer, less is truly more. Lightly dust bronzer where the sun would naturally hit—across your forehead, cheekbones, and jawline. Use a large, fluffy brush and build up gradually to avoid harsh edges or an overdone effect.
| Bronzer Placement Area | Effect Achieved | Pro Tip |
|---|---|---|
| Forehead (near hairline) | Adds warmth and dimension | Use minimal product for a natural shadow |
| Cheekbones (under) | Mimics subtle contouring | Blend upwards into blush for seamless transition |
| Jawline (light sweep) | Sculpts face softly | Avoid sharp lines by buffing well |
Avoid Common Mistakes
The secret to this look is restraint. Always tap off excess product from your brush before application. Build color slowly—you can always add more if needed. Remember, in American beauty culture, the “no-makeup” look is about enhancing what’s already there rather than masking it.
Expert Tip:
If you feel like you’ve applied too much, use a clean brush or makeup sponge to diffuse and soften any edges for that undetectable finish.
5. Blending for a Seamless Result
One of the most crucial steps in achieving the coveted no-makeup makeup look is mastering the art of blending your blush and bronzer. Without proper blending, even the most carefully chosen shades can appear streaky or unnatural. To keep your makeup looking soft, subtle, and camera-ready, here are some essential tips and techniques to ensure a seamless finish.
Keys to Blending Blush and Bronzer
| Technique | Purpose | How-To |
|---|---|---|
| Circular Motions | Create a natural fade between product and skin | Use a fluffy brush and blend using gentle, circular motions along cheekbones and temples. |
| Tapping Excess Off Brush | Prevent over-application and harsh lines | After picking up product with your brush, tap off any excess before applying to your face. |
| Layering Gradually | Build color for control and softness | Start with a light hand and add more product in thin layers until desired intensity is reached. |
| Using Clean Brush or Sponge | Smooth out edges for a flawless finish | Blend out any harsh lines with a clean, dry brush or beauty sponge after initial application. |
Soft-Focus Finish Tips
- Avoid dragging: Always blend upwards and outwards—never drag your brush downwards as it can muddy the look.
- Select the right tools: Opt for brushes with soft, synthetic bristles for powder products; for cream blush or bronzer, use a damp beauty sponge for best results.
- Check in natural light: Step near a window to ensure your blending looks seamless under real-life conditions, not just bathroom lighting.
- Finish with translucent powder (optional): A light dusting can help further diffuse edges without dulling the color payoff.
The Bottom Line on Blending
No matter what products you use, blending is what transforms your blush and bronzer from obvious streaks into an effortless glow. Take your time with this step to ensure everything melts naturally into your skin, leaving you with that barely-there, lit-from-within radiance that defines the no-makeup makeup look. With these blending keys, youll be able to avoid harsh lines and achieve that coveted soft-focus finish every time.
6. Finishing Touches and Setting Tips
After you’ve perfected your blush and bronzer application for that effortless “no-makeup” makeup look, it’s time to lock in your masterpiece without dulling your skin’s natural radiance. Choosing the right setting products is key—think lightweight, breathable formulas that enhance rather than mask. Here’s how to keep your glow going all day:
Choosing the Right Setting Product
| Type | Best For | Application Tip |
|---|---|---|
| Setting Spray | All skin types; dewy finish lovers | Mist lightly 8-10 inches from face; let air dry for a fresh look |
| Translucent Powder | Oily or combination skin; matte finish seekers | Use a fluffy brush to dust a thin layer on T-zone only to avoid a cakey look |
| Luminous Powder | Dry or dull skin; those wanting extra glow | Sweep lightly over high points of face (cheekbones, forehead) for added radiance |
Pro Tips to Keep Your Look Fresh and Natural
- Don’t Overdo It: Less is more—focus only on areas prone to shine or makeup movement.
- Avoid Heavy Baking: The “no-makeup” look is all about skin showing through, so skip heavy powdering under the eyes or jawline.
- Dewy vs. Matte: Pick a finish that matches your vibe. Dewy sprays are perfect for a healthy glow, while matte powders help with longevity in hot climates.
- Tame Flyaways: A quick spritz of setting spray can double as a way to smooth down baby hairs around your hairline.
Your Effortless Look, All Day Long
The right setting technique ensures your blush and bronzer stay seamless and natural-looking from morning coffee runs to evening plans. Remember, the goal is never to hide but to highlight the beauty you already have. By locking in your look with the right products, you’ll keep that fresh-faced confidence glowing all day.